
Getting started
From the installed APK to the first game launched, by way of the first-launch assistant.
Xendroid+ emulates the Xbox 360 on Android. It does not include games: you use copies of your own discs or from your own console. This page takes you from the installed APK to the first game launched.
Experimental
How each game runs depends on the game, the device and the GPU driver. Some titles run well; others still have glitches or don't start. Before installing, check the requirements.
1. Install the APK #
Download the APK for build 63 from the download link or from the GitHub releases, and install it. The step-by-step guide, with the SHA-256 check and the permission to install apps, is in Install and update.
2. Follow the first-launch assistant #
The first time the app opens, the assistant appears on its own. It has five steps, always with Skip and Back at hand; everything can be changed later.
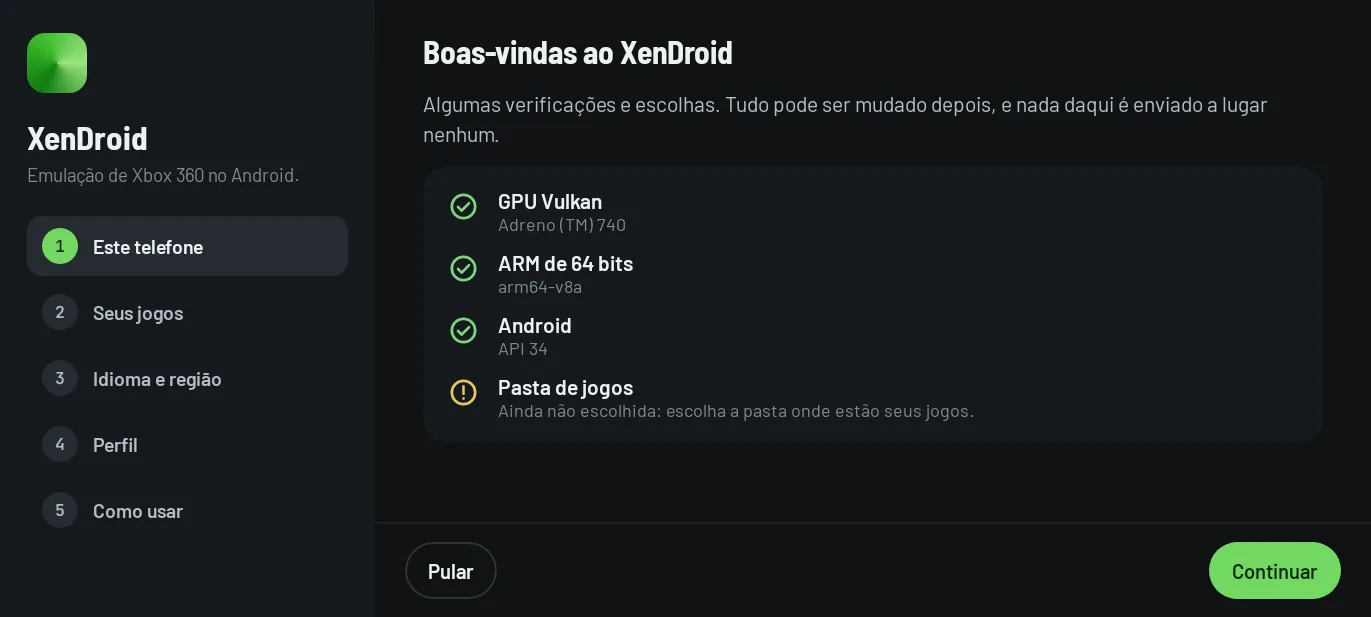
- This phone. The app checks whether there is a GPU with Vulkan (without one, games don't run), whether the processor is 64-bit ARM, the Android version and whether a game folder already exists. On Android 10 a warning appears: choosing a game folder needs Android 11 or newer.
- Your games. Choose the folder that holds your games (ISO, XEX, ZAR or packages). The scan happens right there, showing how many games were found and their covers. If you don't have a folder yet, Create standard folders creates
XenDroid/Games,XenDroid/TUandXenDroid/DLCin internal storage: the first becomes a game folder; the other two, content folders (updates and DLC). - Language and region. The assistant suggests the console language and country based on the phone's language; Use them for games writes both to the global configuration. If the phone's language does not exist on the console, games stay in English.
- Profile. Games save to a profile (gamertag, up to 15 characters). Create yours right there; it becomes active as P1. If you skip this step, the app creates a profile called “XenDroid”.
- How to use. Choose the interface mode (Automatic, Touch or Controller) and how many settings to show (Essential, Advanced or All). The phone's own Vulkan driver is enough to start; a Turnip driver can be installed later in Drivers.
You can reopen the assistant from the library's ⋮ menu (Setup assistant) or from the About screen.
All Files Access
The library reads game folders by their real path, which on Android 11 or newer requires the All Files Access permission. When it is missing, the app opens the system screen so you can grant it, and checks again when you come back.
3. Launch a game #
Tap a game in the library. In landscape, the first tap shows the game's panel beside it, with Play and the quick settings; a long press (or Details) opens the full details page. Play starts loading, which shows the launch steps.
A game's first launch is usually the slowest: the app is still building that game's shaders and pipelines, and the stutters decrease in later sessions.
4. While playing #
The in-game menu opens in three ways:
- swiping in from the left edge of the screen;
- with Android's Back (gesture or button);
- with the controller's Guide button.
By default, the game is paused while the menu is open. The menu holds the image, the FPS limit, the performance HUD, the controls and the way out of the game. See the in-game menu in detail.
Next steps #
- Settings and effects: how global and per-game settings work.
- GPU drivers: when it is worth replacing the system driver with Turnip.
- Troubleshooting and logs: what to do when a game won't launch.
- The simulator shows the assistant and the other screens in the browser.